


Endpoint Insights
Using SCCM 2012 Application Model to Install CMTrace – File Version
Topics: Endpoint Insights
Like many SCCM admins, it seems that I’m always reviewing log files! One of the things that will drive me nuts is trying to review a log file using Notepad (sorry Wally, but it is really hard to read them with Notepad). In a previous blog post I showed you how to install PsExec, however, a question came up as to why I didn’t use the file version, so this blog post will show you how to use the application model to deploy CMTrace to your PCs using file version instead of the registry key. What is CMTrace? CMTrace is a real-time log file viewer for System Center 2012 (R2) Configuration Manager. You can read more about CMTrace in my blog post from yesterday.
How do you ensure that all of your System Center 2012 R2 Configuration Manager (CM12 R2) clients are running the latest version of CMTrace? Create an application model by using the following steps to deploy CMTrace to your workstations and servers.
1. Download the System Center 2012 R2 Configuration Manager Toolkit http://www.microsoft.com/en-us/download/details.aspx?id=36213.
2. Install the toolkit on your site server.
3. Locate the CMTrace program which is generally found here C: Program Files (x86)ConfigMgr 2012 Toolkit R2ClientTools.
4. Copy the CMTrace program to your source file location.
5. Create a batch file called CMTrace_Install.bat with the following command:
copy “%~dps0CMTrace.exe” “%windir%system32”
6. In the CM12 R2 console, click on the Create Application button in the Software Library node.

7. Select the “Manually specify the application information” option. Click Next.

8. Fill in the details about your application and click Next.

9. Fill in the details in this dialogue box and then click Next.

10. Click Add…

11. Select Script Installer then click Next.

12. Fill in the details and click Next.

13. Enter the source location and the batch file information and then click Next.

14. Click Add Clause….

15. Click Browse….

16. Locate CMTrace in the C:WindowsSystem32 directory and click OK.

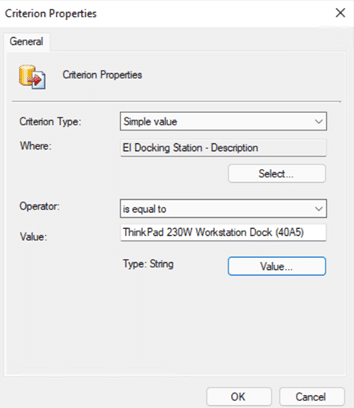
17. Select “The file system setting must satisfy the….” Change the Property to Version and enter the value of 5.0.7804.1000 then click OK.
Note: This is the version number of CMTrace R2. You can find the current version number by looking at the file properties as seen below.


18. Click Next.

19. Change the options as required and click Summary and then Next.

20. Click Close.

21. Click Summary.

22. Click Next.

23. Click Close.
Treat this application script just as you would any other application deployment. I assigned this to my All Desktop and Server Clients collection. Now you will never be without CMTrace on any of your PCs! If you have any questions about how to use the application model to deploy CMTrace to your computers, please feel free to leave me a note in the comment section. Or you can contact me on Twitter at @GarthMJ.