


Endpoint Insights
Add Tables to the ConfigMgr Data Warehouse
Topics: Endpoint Insights
Back in October, I was asked via Twitter, what tables (apart from the default ones) do I add to my Configuration Manager (ConfigMgr/SCCM/MEMCM) data warehouse? That was a great question and it ultimately led me to realize that I never created a blog post about how to add tables to the ConfigMgr data warehouse. That is until now! This post shows you how to add tables, force a sync, and how to solve a sync error that I encountered.
If you don’t already have the ConfigMgr data warehouse installed, make sure to follow the instructions in my blog post, “Step by Step Guide on How to Setup the SCCM Data Warehouse Feature.”
How to Add Tables to the ConfigMgr Data Warehouse

Start adding tables to your ConfigMgr data warehouse by opening the ConfigMgr console and the Administration workspace. Expand the Site Configuration | Servers and Site System Roles nodes. In the center window, select your data warehouse server. In the Site System Roles area, select Data Warehouse service point and then click on the Properties button.

Next, select the Synchronization Settings tab.

Click on the Select tables… button.

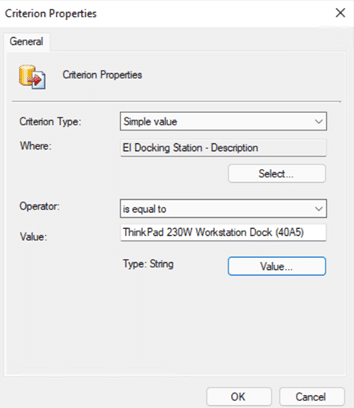
On the Database tables window, select the tables that you wish to add. Keep in mind that by adding tables, you are increasing the size of your data warehouse database. I only selected a few tables: the ones related to Endpoint Insights Reporting and Warranty Information Reporting.
Click OK when you are done. Once the tables are added, the data warehouse service point performs a full sync to the data warehouse at the next synchronization cycle. From that point on the service continually performs a delta sync.
How to Force a Synchronization of the Data Warehouse

Now that the new tables are added, if you want to see the details in the data warehouse right away, you need to force a full sync instead of waiting for the next synchronization cycle. Simply click on the Synchronize now button.

Click on the OK button. Once you click on the button, though, how do you know when the sync starts or finishes?
![]()
The answer is fairly easy: review the status messages.
In the screenshot above, MessageID 11201 shows that the data warehouse sync started and MessageID 11203 tells me that the data warehouse sync completed successfully.
Note: There is a delay between the time you click on the Synchronize now button and when the first status message shows up. I found that this can be around 10-minutes. Don’t forget to refresh the status message window in order to see updated messages.
Data Warehouse Sync Error
When I clicked to view MessageID 11202 in the above screenshot, the following message appeared.

Here’s the full description of the status message error:
Data Warehouse Synchronization Service encounters error (VIEW SERVER STATE permission was denied on object ‘server’, database ‘master’.
The user does not have permission to perform this action.). Please refer to the Microsoft.ConfigMgrDataWarehouse.log for details.

Also, when I reviewed the Microsoft.ConfigMgrDataWarehouse.log on my data warehouse server, I saw a similar message (see above). In this case, what do you do?
Solution
The fix is fairly simple. You need to grant the View server state permission in your SQL Server to your data warehouse server. In my case, the Primary (CAS) and SQL Server are on the same server, so that explains my SQL Server’s name. You’ll see what I mean in the following step.

Open SQL Server Management Studio (SSMS), connect to your SQL Server (in my case it’s CM-CAS-CB1), expand the Security | Logins nodes. Next, locate your data warehouse server (in my case it’s CM-DWH-CB1).

Right-click on the data warehouse server and select Properties.

On the Login Properties window, select the Securables node.

In the Permissions for CM-CAS-CB1 section, on the Explicit tab, scroll down to the bottom and select the Grant option next to the View server state permission.
Click on the OK button to complete the task. Once that permission is applied, the errors disappear from both the ConfigMgr console and the data warehouse log file.
Tables Added to the ConfigMgr Data Warehouse
At the moment, only the tables related to Endpoint Insights products are added to my ConfigMgr data warehouse. As the Enhansoft team writes more dashboards and reports specifically for the data warehouse, more tables will be added to it.
If you have any questions about how to add tables to the ConfigMgr data warehouse, please feel free to contact me at @GarthMJ.